
How to Transfer Photos from iPhone to PC
With an excellent camera and outstanding technology, iPhone is one of the best smartphones for photography.
Why need to transfer photos from iPhone to computer?
With an excellent camera and outstanding technology, iPhone is one of the best smartphones for photography. Your may store lots of beautiful scenery, important people, and happy moments in your iPhone. And sometimes, you want to backup these pictures for some purposes, such as,
- Free up some space: As time goes by, your iPhone can run out of its storage, but you don’t want to lose these pictures. So the best way to solve this condition is to transfer photos from iPhone to computer.
- Edit iPhone pictures. For some professional users, the process is more often than other people. If you are a photographer, it is somehow necessary to send iPhone pictures to better edit them on a professional software.
- Backup important data. In case of any unexpected error leading to data loss, saving precious photos on a computer or external drive is a wise way to protect data.
Choose a proper iPhone to PC transfer software
Back in the old time, people use iTunes to share iPhone files to computer. But now iTunes can’t meet some demands. For example, some photos earlier saved on your device will be deleted. And you may find your iPhone can’t import photos to computer because iTunes can’t transfer photos back if they were sent from PC to iPhone via iTunes.
Here we recommend AOMEI MBackupper, which is the easiest way to perform such a process. It is professional transfer software enabling users to share data, including photos, videos, contacts, music, etc. between iPhone and Windows computer or an external disk.
It comes with various features that make it to be the ideal solution to protect your precious photos from loss or damage, including
- Stable and fast transfer: AOMEI MBackupper provides a much faster transferring speed to save pictures. It saves you lots of time if you got a bunch of items.
- Support Preview and select items: You are allowed to preview all the pictures on your iPhone and choose whichever items you need to save on the computer.
- Hold the original size: After transferring data, you take have the original photo quality on your PC.
- Support nearly all photo formats, including HEIC, GIF, JPEG, JPG, DNG, PNG, and so on.
- Support Incremental Backup: You can only backup newly take picture on your iPhone the next time you put photos on the PC.
- Work perfectly with all iDevices. Apart from iPhone, AOMEI MBackupper helps you transfer iPad/iPod data to a PC or external disk.
How to transfer photos from iPhone to Windows 11/10/8/7 computer
Now you can check the steps below to see how it works.
Step 1. Connect iPhone with a computer via USB cable and tap “Trust” on your iPhone.
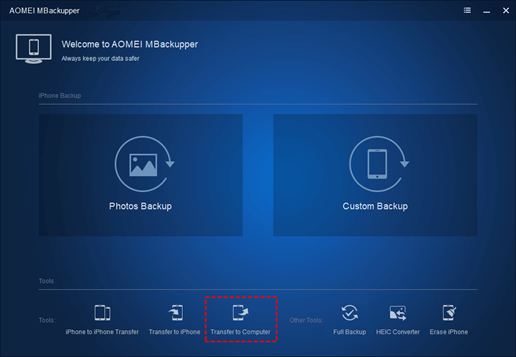
Step 2. Download, install, and run AOMEI MBackupper on the PC. Click “Transfer to Computer” on the main interface.
Note: If you want to have an incremental backup afterward, you can choose the “Custom Backup”.
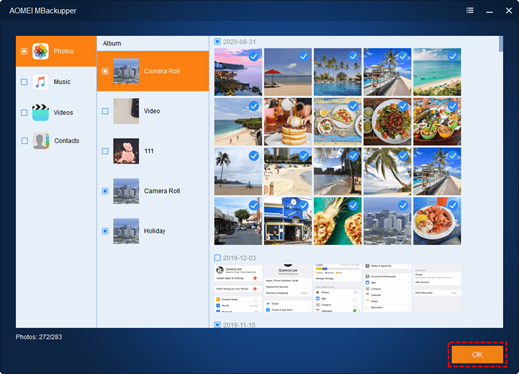
Step 3. Click the “+” icon. And tick the “Photo” option. And you can choose a specific album or pictures to save on the PC. Then hit orange “OK” button.
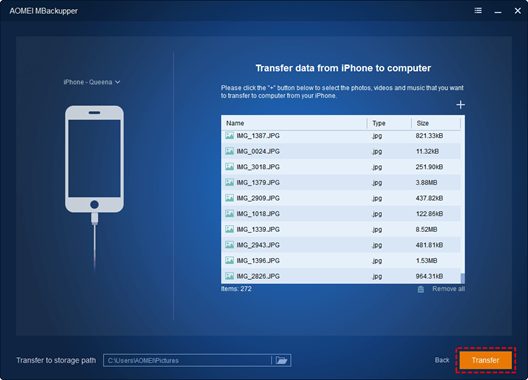
Step 4. All the selected photos will be listed here. You can click the folder icon to change a storage path. Click “Transfer” to start the process.
Tip: If you are transferring HEIC pictures, which can’t be viewed and edited on Windows computer, you can choose the “HEIC Converter” option on AOMEI MBackupper to switch the format to PNG/JPEG/JPG.
Conclusion
This is how to transfer photos from iPhone to PC easily. With AOMEI MBackupper, you can easily save photos, videos, contacts, music, and other data to computer and external disk. Besides, if you need, this tool can also help you import photos from computer to iPhone/iPad.